6 Steps to Add Your Business to Apple Maps and Boost Local Visibility
Learning how to add business to Apple Maps isn’t just a nice-to-have anymore – it’s essential for capturing a premium, mobile-first audience. With over 70% of iPhone users relying on Apple Maps for navigation and voice search, missing out means losing potential customers every single day.
The best part? Getting your business on Apple Maps is straightforward, free and can dramatically boost your local visibility. Let’s walk through exactly how to do it and why it matters.

Why Apple Maps Is a Game Changer for Local Businesses
According to Apple’s data, over 70% of iPhone users depend on Apple Maps for daily navigation and location searches. That’s millions of potential customers actively looking for businesses in their area.
The real magic happens through integration. Apple Maps powers Siri voice searches, appears in iMessage conversations, connects with CarPlay for in-car navigation, and integrates with Apple Watch. This isn’t just a standalone app – it’s woven into the entire Apple ecosystem.
Demographics matter too. Research by Consumer Intelligence Research Partners (2024) shows iPhone users tend to have higher household incomes and greater purchasing power. If your business targets premium customers, Apple Maps puts you directly in front of them.
Before You Start: What You’ll Need
Before diving into the process to add company to Apple Maps, gather everything you’ll need. Preparation prevents frustration and speeds up verification.
Essential items:
- Apple ID – Personal or business-managed account
- Business information – Your exact NAP (Name, Address, Phone number)
- Legal verification documents – Business license, utility bill, or government registration
- Brand assets – Logo files, professional photos of your location and team
- Website and social links – URLs to your website and active profiles
Pro tip: Use an actual Apple device (iPhone, iPad, or Mac) when setting up your listing. The process is smoother and verification often happens faster within the Apple ecosystem.
NAP consistency matters enormously. Your business name, address, and phone number must match exactly across all platforms – your website, Google Business Profile, Yelp, social media and Apple Maps.
How to Add Your Business to Apple Maps
Ready to get started? Follow these six steps to claim business on Apple Maps and maximize your local presence.
Step 1: Sign in to Apple Business Connect
Navigate to Apple Business Connect and sign in with your Apple ID. If you don’t have one, create it first – the process takes just a few minutes.
Apple Business Connect is the centralized dashboard where you’ll manage your presence across Apple Maps, Siri, Wallet, and other Apple services. Think of it as Apple’s version of Google My Business.
Step 2: Search for and Claim Your Business
Use the search function to look for your business by name and address. Two scenarios exist:
- If your business already exists: Apple may have automatically added it from third-party data sources. Click “Claim this business” to take ownership.
- If your business doesn’t exist: Click “Add a new business” and start from scratch. This gives you complete control over how your information appears.
Many businesses are already listed without their knowledge. Claiming an existing listing is faster than creating new.
Step 3: Verify Ownership
Business verification is crucial – Apple won’t publish your listing until ownership is confirmed.
Verification methods:
- Phone verification – Apple calls your business number (fastest option)
- Email verification – Receive a verification code via email
- Document upload – Submit business license or utility bill (3-5 business days)
Choose the method that works best for your situation. Phone verification is typically quickest.
Step 4: Add Accurate Details
This step determines how effectively you attract customers. Complete every available field – incomplete profiles get less visibility and inspire less trust.
Critical information to include:
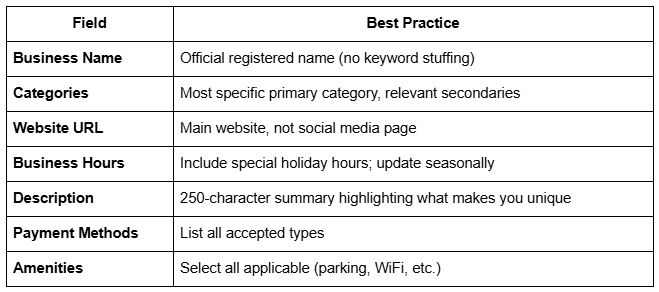
Schema markup for local businesses helps search engines understand your information better. While Apple Maps doesn’t require manual schema, ensuring your website uses proper LocalBusiness schema improves overall local SEO.
Step 5: Upload Logo, Photos and Location Pin
Visual content makes or breaks first impressions. Professional imagery dramatically increases engagement and click-through rates.
Photo guidelines:
- Logo: High-resolution square format (minimum 1024x1024px)
- Cover photo: Welcoming exterior or interior shot
- Additional photos: Team members, products, services, happy customers
- Location pin: Ensure it drops precisely on your physical location
Research by BrightLocal (2024) found that listings with 10+ photos receive 42% more direction requests and 35% more website clicks than those with minimal imagery.
Step 6: Publish and Review Your Listing
Before hitting publish, double-check everything. Look for typos, verify hours, confirm your phone number, and preview how your listing appears on an iPhone.
Once published, your listing typically appears within 24-48 hours. However, optimization continues long after initial publication.
Post-publication maintenance:
- Monitor and respond to customer reviews
- Update hours for holidays or special events
- Add seasonal promotions or announcements
- Refresh photos quarterly
- Track analytics to measure impact
Branding Tips for a Stand-Out Apple Maps Profile
Simply being listed isn’t enough – you need to stand out. As a California Branding and Marketing expert with over 20 years of experience, I’ve learned that consistency and authenticity win every time.
- Visual consistency matters: Your Apple Maps profile should mirror your brand across all platforms. Use the same logo, color palette, and typography. When someone sees your listing, they should instantly recognize your brand.
- Photo strategy: Generic stock photos scream “I don’t care.” Instead, showcase your actual location, real team members, and genuine customer interactions. Before-and-after photos work incredibly well for service businesses.
- Tell your story briefly: Use your 250-character description wisely. Instead of “We provide excellent service since 1995,” try: “Family-owned bakery serving handcrafted sourdough and pastries using organic, locally-sourced ingredients since 1995.”
Quick Optimization Checklist
Use this checklist to ensure your Apple Maps presence is fully optimized:
Claimed and verified – Ownership confirmed through Apple Business Connect
Correct categories – Primary and secondary categories accurate
Updated photos – Minimum 10 high-quality images
NAP consistency – Name, address, phone match across all directories
Complete information – Hours, website, payment methods filled in
Showcase posts active – Regular updates about promotions or news
Review monitoring – Responding to customer feedback on connected platforms
Your Apple Maps Strategy Starts Now
Apple Maps isn’t just a map – it’s a trust signal and visibility engine connecting you with millions of high-value customers actively searching for what you offer. Learning how to claim and verify my business on Apple Maps positions you ahead of competitors ignoring this powerful platform.
The process takes less than an hour initially, but long-term benefits compound over months and years. Better visibility, more phone calls, increased foot traffic, and stronger local presence – all from a free listing most businesses haven’t optimized.
Ready to dominate Apple Maps and boost your local visibility? At Graphicwise, we help businesses create powerful, consistent brand presences across every platform that matters.
Contact Graphicwise today to get your business on Apple Maps, optimize your entire local presence, and start capturing the customers your competitors are missing. Your next customer is searching right now – make sure they find you.
Serving clients across the globe.

